Protected: Even More Shane Videos
Enter your password to view comments.
I’ve had my civic for a while now and it’s getting close to the big 300k. I have replaced my headlights twice (as a pair) and even the high mount rear brake light. I knew at some point the turn signal light(s) would go, the drivers side turn signal to be exact. I went down to the local auto parts place and found the correct bulbs (which came in a 2 pack). I figured I would replace both as a pair (Sylvania part # 1157ALL).
To my surprise when I went to change them, it was harder than it seems since the bulb access was hidden behind the wheel well. I found a few site with instructions:
It’s not as complicated as it seems. The instructions are actually in the manual:
1. If you are changing the bulb on the driver’s side, start the engine, turn the steering wheel all the way to the right, and turn off the engine. If you are changing the bulb on the passenger’s side, turn the steering wheel to the left.
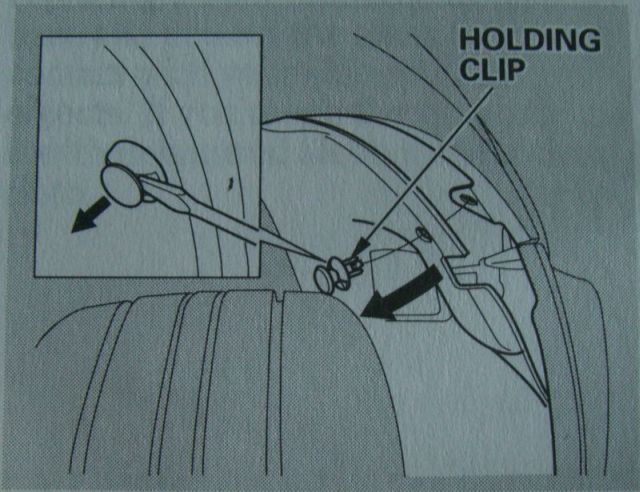
2. Use a flat-tipped screwdriver to remove the holding clip from the inner fender. (ed note: be sure to firmly hold the base of the clip while slowly prying the center piece with the screw driver. If you break the clip you can buy a new one. You only need to remove the 1 single fender clip as show in the honda_civic_replace_turn_signal_99.jpg picture.)
3. Pull the inner fender cover back. (ed note: just enough to get your hand in there, you don’t need much room)
4. Remove the socket from the headlight assembly by turning it one-quarter turn counterclockwise.
5. Remove the burned out bulb from the socket by pushing it in and turning counterclockwise until it unlocks
6. Install the new bulb in the socket. Turn clockwise to lock it into place (ed note: care should be taken as to how you seat the bulb. There are two ways the bulb can go in, one will turn, the other wont. You will notice that the pins that protrude from the side of the bulb are of different dimensions, this is so that the flashing filament faces away from the car and the parking filament faces inward relative to each side of the car)
7. Insert the socket back into the headlight assembly. Turn it clockwise to lock it in place.
8. Test the lights to make sure the new bulb is working.
9. Put the inner fender cover in place. Install the holding clip and tighten it securely.
*Update 10/3/2008 – Currently our efforts are in a holding pattern. Right now the union in the northern states is working with the company to deal with the travel pay issues in those states. More details to follow. Any positives results will be posted here. Since the union is now working with two companies the grievance procedure is separate along with management and labors relation’s interpretation of the contract. However, the language in our contract remains the same as the northern states with the exception of hotel options, or lack there of :(… Spirits remain high…
*Update 9/26/2006 – As of this writing, and the fact that the contract has been ratified, we received NO increase and travel allowance, NO increase in per diem, and NO change in any of the work rules associated with travel treatment. This will all be revisited in 3 years. Hopefully, there will be more consensus in both the membership and the union to improve our contract language during those negotiations. Some additional facts: The federal mileage limit has been raised to 58.5 cent/mile (good news) and Fair Point did receive (in addition to their 10% increase in travel treatment) the option to stay in a hotel regardless of management’s reluctant to administer this benefit (good news for the road warriors in those states).
The latest version of this document can be found on FairTravelPay.com or Here. Please feel free to share your opinions below.
The membership has been squeezed by the ever increasing cost of gas, lodging and meals. The EI technicians in particular have been hurt by this more so than any other department since we use our personal vehicle for business purposes almost exclusively. Since our Travel Allowance and Per Diem have gone without an increase in so long, we are even more affected by the higher prices of gas, lodging, and meals. The only form of compensation that has increased is our mileage rate which is indexed to the federal IRS limit. I have written this paper to advocate for not just EI, but the entire membership. We must increase our Travel Allowance and Per Diem, but we must also index them to a formula and federal limit just as our mileage is.
Travel Allowance is compensation for travel time and expense.
In our Aug 2000 contract with the company we received an increase on Dec 29th 2002 as follows:
There were no changes in our 2003 contract for Travel Allowance.
It has been 5 years 6 months and we have not received an increase in Travel Allowance. If our contract is similar to Fair Point’s we will have to wait a total of 6 years to only get a 5% increase in travel allowance on Jan 1st 2009 and another 5% on Jan 1st 2011.
In the last 5 years Gas prices have increase from about $1.40 a gallon to almost $4.00 a gallon which is an increase of almost 300%. Meanwhile, the IRS mileage has gone from .325 cents a mile to .505 cent a mile, an increase of 150%. Our wages have gone up from $1200 to $1324, an increase of only about 10% in 5 years.
Travel Allowance is compensation in lieu of travel time and expense. If you factor these two elements, the IRS mileage and our current overtime wages (since travel time occurs outside our tours), we are severely under compensated. Here is a chart to help illustrate how undercompensated we are:
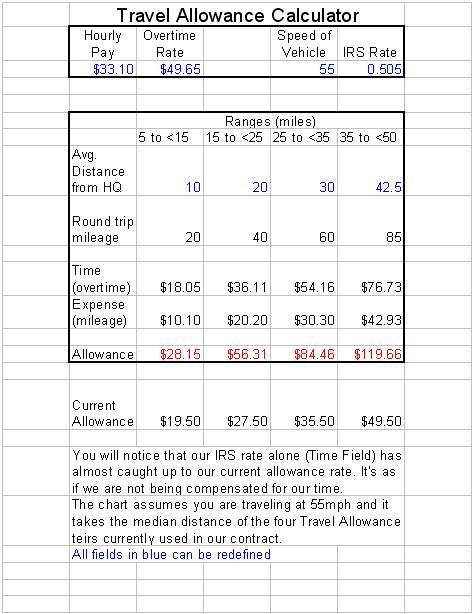
(Click here to download the calculator.)
It is concerning that the IRS rate has almost matched our current Travel Allowance. The IRS rate is also untaxed and the speed of 55mph is a conservative figure since traffic (Boston/Cape) and back roads are not conducive to these speeds. At the current IRS rate it is as if we are being paid below minimum wage ($5/hour) for our travel time.
Technicians in many ways are better served driving to their headquarters first, and then traveling on company time to and from their assigned office at the start and end of each tour. From the companies perspective we would be far less productive due to “windshield time”.
We are essentially doing the company one big favor by reporting to a different work location on our time and dime at $4/gallon. The company gets a full tour out of us while not having to maintain a 200+ fleet of vehicles. To my knowledge, there is nothing in the contract that allows a technician the option of reporting to their headquarters first. The employee is assigned by management to a new location and is given Travel Allowance, period.
If our Travel Allowance was indexed, each year that our wages increased and/or the IRS increased the mileage rate, our Travel Allowance would automatically increase. This could all be based on a simple formula such as the calculator included above.
Our current Per Diem rate is not without its discrepancies.
On the same day in 2002 that our contract increased the per diem from 69 to $76, the standard CONUS (continental United States) rate, which is the bare minimum IRS rate for per diem, was $85.
5 Years later…
In 2008 the CONUS rate is $109. The only county in Massachusetts that applies to the standard rate is Franklin County. All other counties in Massachusetts are near or above $140 a day.
In 2003, we were compensated by almost $10 under the IRS limit and now we are off by staggering $33 a day. In Boston/Cambridge the rate showcases an even bigger disparity. The non-seasonal rate (lowest rate for the area) is $250 a day! Not only is our rate below the CONUS standard rate, but high cost of living areas such as Cambridge does not even qualify for the larger rate (90 vs. 76). This higher rate, $90, in our current contract is below the standard CONUS rate and is only available in 4 locations and the islands. Rhode Island is very similar since the cost of living is just as high in many areas and counties. Just like Franklin County in Massachusetts, Bristol County in Rhode Island is the only county that gets the standard CONUS rate. See the attached city and county graphic for more information.
Recently one of our technicians was talking to a Nortel technician in a Cambridge collocation. The Nortel technicians inquired about how much we received in Per Diem. The Nortel technician was very surprised to find out that we were paid such a high rate of $76 a day.
The Nortel technician responded with this sobering quote, “Wow, you get $76 a day for food! Amazing, how much do you get for your lodging?”
The EI technician interrupted and said, “We get $76 a day for food AND lodging!”
The Nortel technician was equally surprised by this and responded that he got over $250 a day in Per Diem.
The fact is that in Massachusetts and Rhode Island you just can’t get a hotel and meals for under $76 a day. If the company decides to pay for your hotel, then you are allowed a meal allowance of $41 a day. However, if the company decides NOT to put you in a hotel, that leaves $35. Where can you get a hotel for $35?
Some would argue that $76 is a bargain since nobody stays in a hotel. You could easily drive from your house each day and receive the $76 as compensation each day. This is true when you live 20 minutes away. However, let’s calculate how much you should be compensated to commute 50 miles each day and pocket the $76.
The IRS values your expenses at:
$50.50 100miles @ .505 cents per mile
You are left with:
$25.50
This assumes you are compensated for $25.50 for your travel time @ about $15 per hour traveling at 65mph. Since you are traveling outside your tour, it is considered time worked. Our overtime rate is $49.65 per hour. We should be compensated $76 just for our time, let alone our expenses.
The calculation above does not highlight all real word cases. If you intend to personally commute when you are paid Per Diem, you are not always traveling at 65mph NOR is your round trip commute going to be 100 miles. The round trip commute could be 150 or more miles per day. If your round trip commute is 150 or more miles you are essentially getting paid ZERO for you travel time. Again, we are better off reporting to our HQ and then traveling on company time to get to our reporting location each day.
Again, the company gets a bargain here. For the sake of argument, Article P16.15 makes no indication that the employee can choose to take a hotel in lieu of Per Diem. It only indicates that the employee can choose between fully expensed meals OR $41 a day for meals. If an employee specifically asks to be placed in a hotel in lieu of per diem, the company has responded with, “We are not travel agents”.
Since it’s the company choice, they can arbitrarily pick and choose who gets a hotel and where exactly the hotel is placed. Is the hotel in a safe neighborhood? How far is the hotel from you temporary location? What is to stop the company from placing a technician in Waltham when his temporary assignment is Cambridge? That’s 12 miles of morning traffic, another 12 back, and tolls. Does the employee get travel time? Does the employee get mileage from the hotel? The only thing that is for sure is that the employee gets to choose whether he wants the company to pay for his meals or get the $41 meal allowance. Is the employee on a 7 day Per Diem? Did the company arbitrarily place them on a 5 day per diem? Does he see his family at night? Is there an assignment allowance for being away from your family? No. These gray areas have haunted EI for many contracts.
When an employee is called out to work at night, he is compensated for up to 7 hours of pay. When an employee works more than 40 hours, he is given overtime. When an employee works a holiday, he is paid overtime in addition to his regular tour. When an employee changes shift, he is paid overtime for the first 5 days plus 10%. When the employee is placed in a hotel, he is compensated nothing for his time spent away from his family/kids, friends, home, and life style. $41 a day is not a form of compensation, but an expense. There is no “Assignment Allowance”, “Away from Family Compensation”, “Bored in a Hotel compensation”, or “Temporary Relocation Allowance” of sorts. The union has done a great job of compensating individuals for the many hardships we face each day, but this scenario has gone unrecognized. How much is your time away from your family, home, and life style?
EI specifically is forced into higher insurance premiums since we use our vehicles for business use. We are forced to carry 50,000/100,000 coverage (P16.10), and we also never qualify for low mileage discounts from our auto insurance carriers.
I recently had the opportunity to talking with a business agent of local 2320 in New Hampshire. The business agent could not find any information to indicate there was any increase in meals or Per Diem allowance for the next 5 years. That would be a total of 10 years and no increase in meals or Per Diem for the Northern States. If true, this is news is absolutely jaw dropping. One can only hope that there is an increase, but the information was just not available at the time of my discussion.
Per Diem should be, at the very least, indexed to the CONUS standard Per Diem rate of $109.
It has been a long 5 years and gas and other expenses are ever increasing. We have been hit by a double whammy: stale compensation and unworldly expenses. I don’t think anyone in 2003 could have predicted that gas prices would be near $4 a gallon. Along with an immediate increase across the board, we should index our Travel Allowance and Per Diem since it will act as a safety net for the future’s uncertainties. Let’s get the EI department and travel pay out of the shadows and work together to strive for fair travel pay, not Fairpoint travel pay. These changes and increases would provide relief not just to the EI department, but all members.
7. Clear language as to when the employee can be assigned to a 5 or 7 day Per Diem.
8. Hotel that is close/safe/accommodating to your temporary assigned location.
9. Compensation for our increased (and/or lack of discounting) auto insurance premiums.
Massachusetts Per Diem Chart (click graphic to expand)
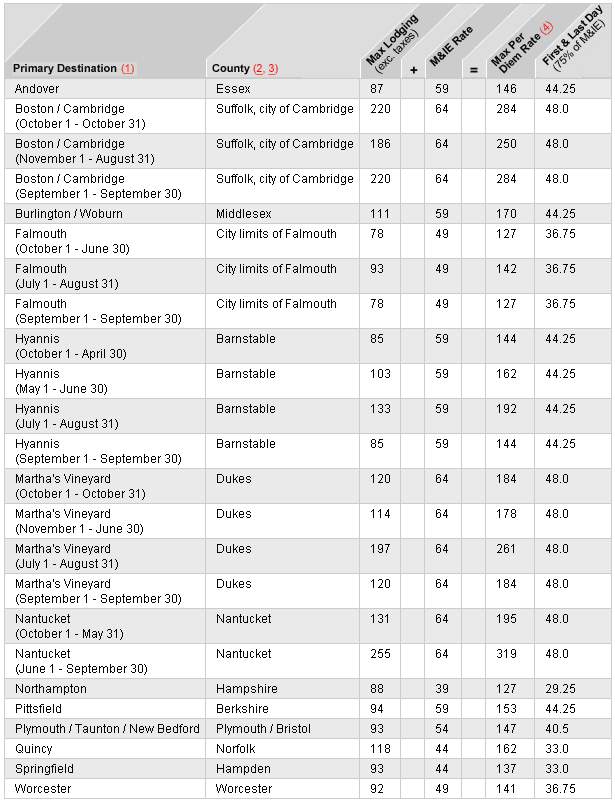
NOTE: If neither the city nor the county is listed, the location is a standard CONUS (continental United States) destination with a rate of $70.00 for lodging and $39.00 for meals and incidental expenses (M&IE).
Rhode Island Per Diem Chart (click graphic to expand)
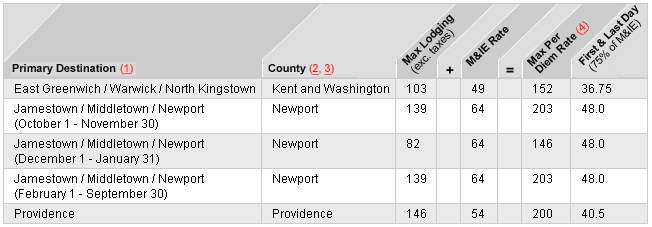
NOTE: If neither the city nor the county is listed, the location is a standard CONUS (continental United States) destination with a rate of $70.00 for lodging and $39.00 for meals and incidental expenses (M&IE).
Reference:
By Christopher Cote (bunklung@yahoo.com) for the membership.
6/4/08 Initial Document
Please feel free to share your opinions below.
Awesome video demonstrating ALL the Singcatcher capabilities:
Awesome video on the details of the Slingbox Pro HD: