I’ve had my civic for a while now and it’s getting close to the big 300k. I have replaced my headlights twice (as a pair) and even the high mount rear brake light. I knew at some point the turn signal light(s) would go, the drivers side turn signal to be exact. I went down to the local auto parts place and found the correct bulbs (which came in a 2 pack). I figured I would replace both as a pair (Sylvania part # 1157ALL).
To my surprise when I went to change them, it was harder than it seems since the bulb access was hidden behind the wheel well. I found a few site with instructions:
It’s not as complicated as it seems. The instructions are actually in the manual:
1. If you are changing the bulb on the driver’s side, start the engine, turn the steering wheel all the way to the right, and turn off the engine. If you are changing the bulb on the passenger’s side, turn the steering wheel to the left.
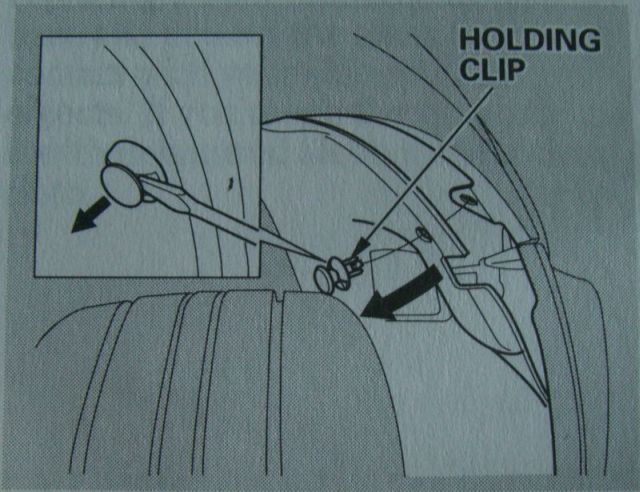
2. Use a flat-tipped screwdriver to remove the holding clip from the inner fender. (ed note: be sure to firmly hold the base of the clip while slowly prying the center piece with the screw driver. If you break the clip you can buy a new one. You only need to remove the 1 single fender clip as show in the honda_civic_replace_turn_signal_99.jpg picture.)
3. Pull the inner fender cover back. (ed note: just enough to get your hand in there, you don’t need much room)
4. Remove the socket from the headlight assembly by turning it one-quarter turn counterclockwise.
5. Remove the burned out bulb from the socket by pushing it in and turning counterclockwise until it unlocks
6. Install the new bulb in the socket. Turn clockwise to lock it into place (ed note: care should be taken as to how you seat the bulb. There are two ways the bulb can go in, one will turn, the other wont. You will notice that the pins that protrude from the side of the bulb are of different dimensions, this is so that the flashing filament faces away from the car and the parking filament faces inward relative to each side of the car)
7. Insert the socket back into the headlight assembly. Turn it clockwise to lock it in place.
8. Test the lights to make sure the new bulb is working.
9. Put the inner fender cover in place. Install the holding clip and tighten it securely.